Rocksett is a high-heat compound designed to secure muzzle devices on firearms, ensuring a tight seal even under extreme conditions. It provides reliable performance and durability.
1.1 What is Rocksett?
Rocksett is a high-performance adhesive compound designed to secure muzzle devices on firearms. It is specifically formulated to withstand extreme heat and ensure a tight, durable seal. Unlike traditional thread compounds, Rocksett adheres to metal surfaces, providing a strong bond that resists loosening from heat, vibration, or recoil. This makes it ideal for high-temperature applications where reliability is critical.
1.2 Importance of Proper Rocksett Instructions
Proper Rocksett instructions ensure a secure, long-lasting bond between the muzzle device and firearm. Incorrect application can lead to loosening under heat or recoil, compromising performance and safety. Following guidelines guarantees optimal results, prevents potential damage, and maintains reliability during use. Adhering to instructions is crucial for both functionality and safety, making it essential to follow them carefully.
Preparing for Rocksett Application
Proper preparation ensures a strong bond and optimal performance. Clean surfaces thoroughly and apply heat to the muzzle device for better Rocksett adhesion and durability.
2.1 Cleaning the Muzzle Threads
Thoroughly clean the muzzle threads using isopropyl alcohol to remove grease, oil, or debris. This ensures a strong, even bond between the Rocksett and the firearm.
2.2 Heating the Muzzle Device
Gently heat the muzzle device using a heat source to ensure Rocksett adheres properly. Avoid overheating, as this can damage the device or compromise the compound’s effectiveness. Maintain a moderate temperature for optimal results. This step is crucial for a secure and lasting bond.

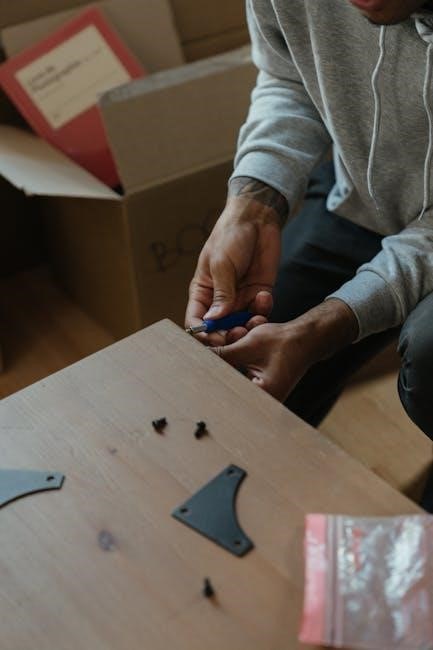
Applying Rocksett
Apply Rocksett evenly to ensure a secure bond between the muzzle device and firearm. Follow instructions carefully for optimal results and durability.
3.1 Spreading Rocksett Evenly
To ensure a proper bond, spread Rocksett evenly across the muzzle threads and device. Use a clean tool or applicator to avoid uneven distribution. Thin, consistent layers are key for optimal adhesion and performance. This method prevents air pockets and ensures the compound sets correctly, providing a reliable seal under heat and stress.
3.2 Installing the Muzzle Device
After applying Rocksett, carefully align the muzzle device with the firearm’s threads. Gently hand-tighten to avoid cross-threading. Once aligned, use the appropriate tool to secure the device firmly. Ensure even pressure to prevent uneven bonding. Do not over-tighten, as this could disrupt the Rocksett layer. Allow the compound to cure undisturbed for optimal results. Proper installation ensures a secure and durable bond.

Allowing Rocksett to Cure
Allowing Rocksett to cure properly ensures a strong, durable bond. Follow the recommended curing time and avoid any disturbances during this period for optimal results. Patience is key.
4.1 Recommended Curing Time
The recommended curing time for Rocksett varies based on environmental conditions. Typically, it requires 24 hours at room temperature to fully set. For faster curing, applying moderate heat can reduce the time to 2-3 hours. Ensure the compound is not disturbed during this period to achieve a strong bond. Proper curing ensures optimal performance and longevity of the muzzle device.
4.2 Avoiding Interruptions During Curing
It’s crucial to avoid touching or moving the muzzle device during the curing process, as this can disrupt the bond and weaken its effectiveness. Keep the firearm in a stable, vibration-free environment to ensure proper setting. Any disturbance can lead to an uneven or incomplete cure, potentially causing the muzzle device to loosen over time. Allow the Rocksett to cure undisturbed for optimal results.

Safety Precautions
Always handle Rocksett with gloves to avoid skin irritation. Ensure good ventilation when applying to prevent inhaling fumes. Keep away from heat sources until cured.
5.1 Handling Rocksett Safely
When handling Rocksett, wear protective gloves and eyewear to prevent skin and eye irritation. Work in a well-ventilated area to avoid inhaling fumes. Avoid prolonged exposure to direct sunlight or heat sources, as this can affect the compound’s properties; Keep Rocksett away from open flames or sparks until it is fully cured. Follow the manufacturer’s guidelines for safe application.
5.2 Avoiding Overheating
While Rocksett is designed to withstand high temperatures, excessive heat can degrade its performance. Avoid exposing the compound to direct flames or sparks before it cures. Use a controlled heat source when heating the muzzle device, and ensure it does not exceed the recommended temperature. Overheating can compromise the seal and reduce the product’s effectiveness. Always follow the manufacturer’s guidelines for heat application.

Tools and Materials Needed
Essential tools include a torque wrench, heat gun, and q-tip. Materials needed are Rocksett, isopropyl alcohol, and a lint-free cloth for a secure installation.
6.1 Essential Tools for Application
For a successful Rocksett application, you will need a torque wrench to ensure proper tightness, a heat gun to heat the muzzle device, and a q-tip for precise application. Additionally, isopropyl alcohol is necessary for cleaning the threads and a lint-free cloth to avoid lint residue. These tools ensure a clean, even, and secure installation of the muzzle device.
6.2 Additional Materials for Optimal Results
For optimal results, consider using gloves to prevent skin contact, safety goggles for protection, and a well-ventilated workspace to avoid inhaling fumes. A small, soft-bristled brush can help apply Rocksett into tight spaces, while thermal-resistant gloves can protect hands when handling heated components. Additionally, a cleaning brush for muzzle threads ensures residue removal, enhancing the bond strength and longevity of the application.

Common Mistakes to Avoid
Common mistakes include insufficient cleaning, uneven application, and overheating, which can weaken the bond or damage components. Proper preparation and adherence to instructions are crucial.
7.1 Insufficient Cleaning
Insufficient cleaning of the muzzle threads and device can prevent Rocksett from adhering properly, leading to a weak bond and potential failure under heat or recoil. Always use isopropyl alcohol to remove grease, dirt, and old adhesive for a clean surface. This step is critical for ensuring the Rocksett application is effective and long-lasting. Proper preparation avoids future issues.
7.2 Incorrect Application Thickness
Applying too much Rocksett can lead to uneven drying and excess material seeping out during installation. Conversely, too thin a layer may result in a weak bond. Aim for a uniform, thin coat on both the muzzle threads and device to ensure proper adhesion and durability. Excess material can be wiped away, but avoiding over-application is key for optimal results.
Troubleshooting Rocksett Issues
If Rocksett doesn’t set, ensure proper surface cleaning and sufficient curing time. Uneven application can be fixed by carefully sanding and reapplying the compound.
8.1 What to Do if Rocksett Doesn’t Set
If Rocksett fails to set, inspect the surfaces for cleanliness and ensure they’re free from contaminants. Re-clean with isopropyl alcohol and reapply a thin, even layer. Verify curing conditions, as insufficient time or improper temperature may prevent setting. Avoid over-application, as this can hinder the curing process. Follow the manufacturer’s instructions carefully to achieve optimal results.
8.2 Fixing Uneven Application
If Rocksett dries unevenly, gently scrape off the excess using a flat tool or sandpaper. Re-clean the area with isopropyl alcohol to remove residue. Reapply a thin, uniform layer, ensuring even coverage. Allow the compound to cure completely before testing. Avoid touching the area during curing to prevent further unevenness. Proper application ensures a secure and lasting bond.
Regularly inspect the muzzle device and Rocksett for wear or damage. Ensure the bond remains secure and no degradation has occurred over time. Regularly inspect the muzzle device and surrounding Rocksett for signs of wear, cracks, or degradation. Ensure the Rocksett bond remains secure and free from loosening or damage. Check for any visible gaps or unevenness that may indicate a need for reapplication or adjustment. Proper inspection ensures optimal performance and safety. Reapply Rocksett if the bond shows signs of weakening, such as loosening or cracks. This is crucial after high-round counts or extreme temperature exposure. Ensure the surface is clean and dry before reapplication. Proper timing prevents performance issues and maintains reliability. Regular maintenance is key to longevity. Proper use of Rocksett ensures a secure and durable muzzle device installation. Follow instructions carefully for optimal results and firearm performance. Safety and precision are key. Clean the muzzle threads thoroughly with isopropyl alcohol. Apply a thin, even layer of Rocksett to both the muzzle and device. Install the device and let it cure undisturbed for 24 hours. Proper preparation and patience ensure a secure, high-performance bond. Avoid overheating or interrupting the curing process for optimal results. Safety and precision are crucial throughout the process. Always follow manufacturer instructions precisely and ensure a clean, dry surface before application. Use the correct tools for even spreading and avoid over-tightening. Regular inspections and timely reapplication can prevent issues. Store Rocksett in a cool, dry place to maintain its effectiveness. With proper care and technique, Rocksett ensures a durable and reliable muzzle device installation.Long-Term Maintenance
9.1 Inspecting the Muzzle Device
9.2 When to Reapply Rocksett
10.1 Summary of Key Steps
10.2 Final Tips for Successful Rocksett Use