Safety Precautions for Using a Battery Tender Charger
Always read the manual before use to ensure safe operation. Avoid exposing the charger to water or extreme temperatures. Use the correct voltage setting for your battery type. Wear eye protection and ensure good ventilation when handling batteries. Never modify the charger or battery connections without professional guidance.
1.1 General Safety Instructions
Read the manual thoroughly before first use and keep it for future reference. Ensure the charger is used in a well-ventilated area away from flammable materials. Do not expose the charger to water or extreme temperatures. Always follow the manufacturer’s voltage settings for your specific battery type. Keep children away and avoid overloading electrical outlets. Regularly inspect cables for damage and avoid modifications without professional guidance.
1.2 Handling Lead-Acid Batteries Safely
Always wear protective goggles and gloves when handling lead-acid batteries. Avoid removing cell caps while charging, as this can release hazardous gases. Ensure the area is well-ventilated to prevent gas buildup. Use the correct charger settings for your battery type to avoid overcharging. Never overload the battery or leave it unattended during charging. Secure the battery in an upright position to prevent spills.
1.3 Important Warnings and Hazard Precautions
Avoid overcharging, as it may cause battery explosion or damage. Keep the charger away from flammable materials and moisture. Do not modify the charger or battery without authorization. Ensure the battery is compatible with the charger’s voltage and type. Never charge a damaged or leaking battery. Disconnect the battery when not in use to prevent deep discharging. Always follow the manufacturer’s guidelines for safe operation and maintenance.

Understanding the Features of a Battery Tender Charger
A Battery Tender Charger offers multiple charging stages, 6V and 12V compatibility, and indicator lights for monitoring charge status, ensuring efficient and safe battery maintenance.
2.1 Multiple Charging Stages Explained
A Battery Tender Charger features multiple charging stages, including bulk, absorption, and float modes. These stages ensure optimal charging by first rapidly charging the battery, then maintaining it at full capacity without overcharging. The charger automatically adjusts to prevent damage, providing a safe and efficient charging experience tailored to your battery’s needs.
2.2 Trickle Charging vs. Maintenance Charging
Trickle charging delivers a low, steady current to maintain a fully charged battery, preventing discharge over time. Maintenance charging, often combined with monitoring, ensures the battery stays at optimal levels without overcharging. Both methods are designed to extend battery life, but trickle charging is typically used for short-term maintenance, while maintenance charging offers long-term preservation and health monitoring.
2.3 Indicator Light Operation and Status Modes
The indicator lights on a Battery Tender charger provide real-time status updates. A red light typically indicates charging in progress, while a green light signals a fully charged battery. Some models feature a yellow light for maintenance mode. Blinking lights may indicate error codes or specific charging phases. Always refer to the manual for precise interpretations of light patterns and modes to ensure optimal charging and battery health.
Step-by-Step Installation and Connection Guide
Disconnect the battery from the vehicle to prevent accidental starts. Connect the charger cables to the battery terminals, ensuring correct polarity. Use ring terminal or alligator clips for secure connections. Plug the charger into a power source and select the appropriate voltage setting for your battery type.
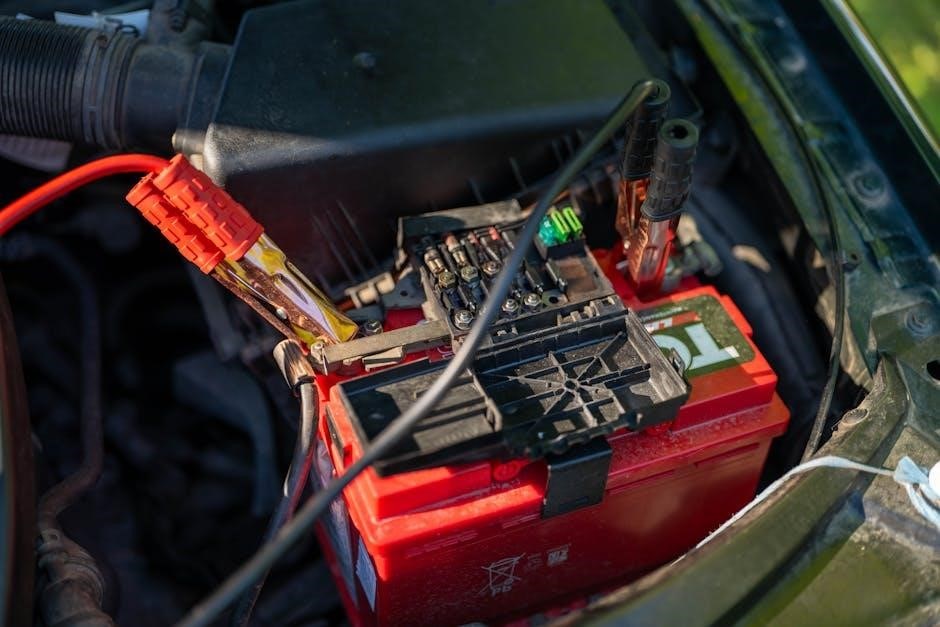
3.1 Connecting the Charger to the Battery
Connect the charger cables to the battery terminals, ensuring correct polarity (red to positive, black to negative). Use alligator clips or ring terminal cables for secure connections. Plug the SAE connector into the charger and verify proper alignment. Double-check the charger settings for voltage compatibility. Always reference the manual for specific model instructions to avoid damage or malfunction during the connection process.
3.2 Testing the Battery Before Charging
Before charging, ensure the battery is in a well-ventilated area and visually inspect for any signs of damage or leaks. Clean the terminals to ensure good connectivity. Use a multimeter to check the battery’s voltage and state of charge. Verify that the charger is set to the correct voltage (6V or 12V) for your battery type. Avoid any open flames or sparks to prevent explosion risks. Always refer to the charger’s manual for specific testing instructions and ensure all safety precautions are followed to prevent damage or injury.
3.3 Initial Charging and Setup
Read the manual thoroughly before initiating the charging process. Set the charger to the correct voltage (6V or 12V) based on your battery type. Connect the charger to the battery terminals, ensuring the positive and negative leads are correctly matched. Double-check for any visible damage on the battery or cables. Place the charger on a stable, heat-resistant surface and ensure good ventilation. Plug in the charger and monitor the initial charging process to ensure proper operation. Refer to the manual for specific setup instructions tailored to your battery tender model.
Operating Instructions for Daily Use
Monitor the charging process regularly and ensure the battery tender is functioning correctly. Keep the charger clean and check connections daily. Always refer to the manual for specific daily maintenance tasks to ensure optimal performance and longevity of both the charger and battery.
4.1 Monitoring the Charging Process
Check the indicator lights regularly to ensure proper charging status. Verify the battery voltage matches the charger’s display. Monitor the charge current and adjust settings if necessary. Avoid overcharging by setting a timer or using the charger’s automatic shut-off feature. Ensure all connections are secure and free from corrosion for optimal performance. Refer to the manual for specific monitoring guidelines and troubleshooting tips.
4.2 Maintaining the Battery Long-Term
Regularly inspect the battery terminals for corrosion and clean them if necessary. Ensure all connections are tight and secure. Store the battery in a cool, dry place when not in use. Use the charger’s maintenance mode to keep the battery at optimal charge levels. Avoid deep discharges by recharging when the voltage drops below 12.4V for 12V batteries. This prolongs battery life and performance.
4.3 Switching Between 6V and 12V Modes
To switch between 6V and 12V modes, ensure the charger is off and disconnected from the battery. Use the mode selection button or switch, typically located on the front panel. Confirm the voltage change by checking the LED indicators or display. Always match the charger’s voltage setting to the battery type to prevent damage and ensure safe, efficient charging.

Troubleshooting Common Issues
Check connections for tightness and corrosion. Refer to error codes in the manual for specific issues. Restart the charger or consult support if problems persist.
5.1 Diagnosing Charging Failures
Start by checking all connections for tightness and corrosion. Verify the AC power source is stable and functioning properly. Refer to the error codes in the manual for specific issues. Ensure the battery is compatible with the charger’s settings. If the charger overheats, allow it to cool before restarting. Consult the manual or contact support if problems persist despite these steps.
5.2 Resolving Error Codes and Indicator Light Issues
Refer to the manual for specific error code meanings and solutions. Check connections for looseness or corrosion and ensure proper battery polarity. Cycle the charger’s power by unplugging and replugging it. Monitor the indicator lights to confirm the issue is resolved. If problems persist, consult the troubleshooting section or contact customer support for further assistance.
5.3 Addressing Battery Performance Problems
Refer to the manual for troubleshooting specific performance issues. Check battery terminals for corrosion and clean them if necessary. Ensure the charger is set to the correct voltage for your battery type. Avoid deep discharges and maintain proper storage conditions. If issues persist, perform an equalization charge or consult a professional for battery testing and replacement.
Advanced Features of Battery Tender Chargers
Advanced models offer solar charging compatibility, Wi-Fi connectivity for remote monitoring, and Boost Mode for reviving deeply discharged batteries, enhancing versatility and convenience for users.
6.1 Using Solar Panels for Charging
Solar panels can be integrated with Battery Tender chargers for eco-friendly charging. Connect the solar panel to the charger, ensuring proper voltage and polarity alignment. This setup is ideal for maintaining batteries in remote locations. The charger automatically switches to solar power when available, optimizing energy efficiency. Always follow the manufacturer’s guidelines for compatible solar panel configurations and ensure safe connections to avoid damage or hazards.
6.2 Wi-Fi Connectivity and Remote Monitoring
Advanced Battery Tender models offer Wi-Fi connectivity, enabling remote monitoring via smartphone apps. This feature allows users to track charging status, receive notifications, and adjust settings remotely. Ensure the charger is connected to a stable Wi-Fi network and download the compatible app. Remote monitoring enhances convenience, especially for batteries in vehicles or equipment stored in distant locations, providing real-time insights and control.
6.3 Boost Mode for Deeply Discharged Batteries
Boost Mode is designed for deeply discharged batteries, providing a high-current charge to quickly restore power. This mode is ideal for emergency starts or reviving dead batteries. Activate Boost Mode via the charger’s interface or app, ensuring the battery type and voltage are compatible. Monitor the process closely to avoid overcharging, as Boost Mode is intended for temporary use only, not long-term charging.

Maintenance and Storage Tips
Regularly inspect the charger and battery for signs of wear. Clean terminals with a wire brush to ensure good connections. Store the charger in a cool, dry place away from direct sunlight. Disconnect the battery when storing for extended periods to prevent drain. Always follow proper disposal guidelines for old batteries to protect the environment.
7.1 Cleaning and Inspecting the Charger
Unplug the charger before cleaning or inspecting. Use a soft cloth to wipe down the exterior, removing dirt or debris. Inspect cables and connectors for damage or corrosion. Clean terminals with a wire brush to ensure proper conductivity. Avoid using harsh chemicals or abrasive materials. Regularly check for signs of wear, such as frayed wires or loose connections, to maintain optimal performance and safety.
7.2 Storing the Charger and Battery
Store the charger in a cool, dry place away from direct sunlight. Keep the battery on a stable surface, avoiding metal contact. Disconnect the charger from the battery and power source. Ensure terminals are clean and protected from corrosion. Avoid extreme temperatures and moisture. Regularly check stored batteries to maintain charge levels, preventing deep discharge. Always follow manufacturer guidelines for storage to ensure longevity and performance.
7.3 Proper Disposal of Old Batteries
Recycle old batteries at designated facilities to prevent environmental harm. Avoid tossing them in regular trash or incinerators. Remove terminal caps and tape them to prevent short circuits. Follow local regulations and guidelines for hazardous waste disposal. Never crush or puncture batteries, as this can release toxic materials. Use protective packaging when transporting old batteries to recycling centers to ensure safe handling and minimize risks. Always adhere to environmental safety standards.